")
Imagine this: the power grid flickers, then dies. 🔦 You’re suddenly plunged into darkness during an unexpected blackout. Now imagine having a reliable, long-lasting, and sustainable light source you crafted with your own hands. That’s where homemade tallow candles come in – these remarkably simple, natural, and incredibly long-burning candles made from rendered animal fat could be your perfect emergency lighting solution.
Tallow candles offer an impressive blend of benefits for both emergency preparedness enthusiasts and sustainability-minded individuals. These traditional light sources have been used for centuries and are making a comeback for good reason.
Why Tallow Candles Are Essential for Your Emergency Preparedness Kit
When it comes to emergency lighting options, DIY tallow candles stand out from conventional alternatives for several compelling reasons:
- Exceptional Burn Time: Tallow candles burn significantly longer than conventional paraffin candles, making them ideal for extended power outages and emergency situations. ⏳
- Cost-Effectiveness: If you source fat scraps from a local butcher or your own kitchen, the cost of making tallow candles can be practically zero – perfect for budget-conscious preppers. 💰
- Sustainability and Resourcefulness: Making tallow candles for emergency use is a fantastic way to reduce waste by utilizing a readily available resource that might otherwise be discarded. ♻️
- Natural Alternative: Compared to commercial candles with unknown additives, tallow candles offer a more natural lighting option with fewer potentially toxic ingredients. 🌿
This comprehensive guide will walk you through each step of creating your own homemade emergency tallow candles, from rendering the fat (or sourcing it pre-rendered) to mastering the candle-making process. By the end, you’ll be prepared for the next unexpected blackout while embracing a more sustainable practice that connects you with traditional skills.
Understanding Tallow: The Foundation of Your Emergency Candles
What Exactly Is Tallow?
Tallow is simply animal fat that has been rendered (slowly melted down) to remove impurities. This traditional material has been used for centuries in candle making and soap production, typically derived from beef or mutton fat. Its high melting point and clean-burning properties make it an ideal material for creating long-lasting emergency candles.
Why Tallow Is Ideal for Emergency Candles
The remarkably long burn time and potential for near-zero cost are the primary reasons tallow shines as an emergency candle material. When properly made, tallow emergency candles can burn for 8-10 hours or more, outlasting many commercial alternatives. You’re also utilizing a resource that might otherwise be discarded, transforming it into a valuable tool for emergency preparedness. 👍
Sourcing Your Tallow: Two Approaches for DIY Candle Makers
There are two primary ways to obtain the tallow needed for your emergency candle making project:
1. Rendering Your Own Tallow (The DIY Approach)
This is the perfect option for homesteaders or anyone interested in complete self-sufficiency. Rendering your own tallow gives you total control over the process and the quality of your candle material. It’s also the most cost-effective approach for creating homemade tallow candles.
2. Purchasing Rendered Tallow (The Convenient Option)
Not everyone wants to render their own fat, and that’s perfectly fine! You can purchase pre-rendered tallow from online retailers, butcher shops, or some farmers’ markets. Look for terms like “100% rendered tallow,” “beef tallow,” or “mutton tallow” when shopping.
Quality Matters: Good quality tallow for emergency candle making should be solid at room temperature, have a creamy white or light yellow color, and a mild, slightly “beefy” or “sheepy” smell (depending on the source). If it smells rancid or off, don’t use it for your candles.
Rendering Tallow: A Step-by-Step Guide for Emergency Candle Makers
Why Rendering Is Essential for Quality Tallow Candles
Rendering purifies the fat, removing any remaining bits of meat, connective tissue, or water. This crucial process results in cleaner-burning, longer-lasting, and better-smelling emergency tallow candles that you can rely on when the power goes out.
Materials and Tools You’ll Need
- Animal fat (beef or mutton fat works best for emergency candles)
- Large, heavy-bottomed pot or slow cooker
- Sharp knife or meat grinder (optional, for faster rendering)
- Fine-mesh sieve or cheesecloth
- Heat-safe containers for storing the rendered tallow (jars, etc.)
- Wooden spoon for stirring
The Rendering Process (Dry Method)
- Preparing the Fat: Cut the fat into small, uniform pieces (about 1 inch or smaller). The smaller the pieces, the faster and more efficiently the fat will render. For even more efficiency, use a meat grinder to grind the fat, which will significantly speed up the rendering process.
- The Slow Melt: Place the fat pieces in your pot or slow cooker. Set the heat to the lowest possible setting. The goal when making tallow for emergency candles is to melt the fat very slowly, without burning it. This patient process may take several hours, depending on the amount of fat and your heat source.
- Simmering and Separation: As the fat melts, it will begin to separate. The liquid tallow will rise to the top, and the solid bits (called “cracklings”) will sink to the bottom. Continue to simmer gently, stirring occasionally, until all the fat has melted and the cracklings are golden brown and crispy.
- Straining for Purity: Line your sieve or colander with several layers of cheesecloth. Carefully pour the melted tallow through the cheesecloth into a clean container. This will remove any remaining solid particles, leaving you with pure, clean tallow for your emergency candles.
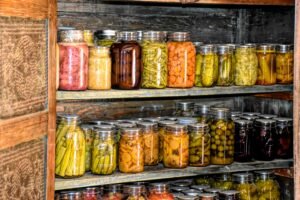
- Cooling and Storage: Allow the strained tallow to cool completely at room temperature. It will solidify into a hard, opaque substance. Once solid, store the tallow in airtight containers in a cool, dark place. Properly rendered tallow can last for a very long time (months, even years) without going rancid.
Adding Natural Scents During the Rendering Process (Optional)
To add subtle natural scent to your homemade tallow candles, consider adding herbs or spices to the pot during the final hour of simmering. Good options include rosemary, lavender, cloves, or cinnamon sticks. Be sure to strain them out along with the cracklings. 🌿
Troubleshooting Your Tallow Render
- Burning Smell: The heat was too high. Start over with a lower heat setting to ensure quality emergency candles.
- Tallow Not Solidifying: There may be too much water remaining in the tallow. You can try re-melting it and simmering it for a longer period to remove more moisture. Alternatively, try placing it in a cooler area.
- Strong, Unpleasant Smell: The fat may have been old or not properly stored before rendering. It’s best to discard this batch and start with fresh fat for your emergency tallow candles.
Gathering Your Candle-Making Supplies: Preparing for Success
The Essential Supplies for DIY Tallow Candles
- Rendered Tallow: Your base material for emergency candle making
- Wicks: Choosing the right wick size is crucial for a good burn. As a general rule, use thicker wicks for wider containers. Consider referencing an online wick sizing guide for your specific container.
- Containers: Heat-safe jars, tins, or other containers are essential. Make absolutely sure they can withstand the heat of the melted tallow and the burning candle. Mason jars are a good, safe option for emergency tallow candles.
- Double Boiler: A double boiler is the safest way to melt tallow. If you don’t have one, create a makeshift double boiler by placing a heat-safe bowl over a pot of simmering water.
- Thermometer: A candy thermometer or other heat-safe thermometer for monitoring the temperature of the tallow, especially when adding fragrance oils.
- Wick Stickers/Glue Dots: These help secure the wicks to the bottom of your containers.
- Wick Centering Devices: Pencils, chopsticks, or specialized wick centering devices will keep your wicks straight while the tallow cools.
Optional Additions for Custom Emergency Candles
- Fragrance Oils: If you want scented emergency candles, use candle-safe fragrance oils. It’s crucial to check the flash point of the fragrance oil (the temperature at which it can ignite) and make sure the tallow is below that temperature before adding it.
- Dye: Candle dye can add color to your tallow emergency candles, but it’s entirely optional.
Container Selection: Safety and Style for Tallow Candles
Always prioritize safety when choosing containers for DIY emergency candles. Ensure they are made of heat-safe materials like glass, metal, or ceramic. Avoid plastic or any material that could melt or crack. Beyond safety, you can choose containers that fit your personal style and the size of candle you want for your emergency preparation kit.
The Tallow Candle-Making Process: Step-by-Step Instructions
Prepare Your Workspace
Cover your work surface with newspaper or cardboard to protect it from spills. Have all your supplies within easy reach before beginning the emergency candle making process.
Secure the Wicks
Attach a wick sticker or a small dab of hot glue to the metal tab at the bottom of each wick. Carefully center the wick in the bottom of each container, pressing firmly to secure it in place for your homemade tallow candles.
Melt the Tallow Safely
Place the rendered tallow in your double boiler (or makeshift double boiler). Heat gently over low heat until the tallow is completely melted. Use your thermometer to monitor the temperature. For the best emergency tallow candles, aim for a temperature around 170-180°F (77-82°C), or below the flash point of your fragrance oil if you are using one.
Adding Fragrance and Color (Optional)
- Fragrance: Once the tallow has reached the appropriate temperature (below the flash point of your fragrance oil), remove it from the heat and add the fragrance oil. A general guideline is to use about 1 ounce of fragrance oil per pound of tallow, but always follow the manufacturer’s instructions. Stir gently but thoroughly for about two minutes to ensure the fragrance oil is fully incorporated into your emergency candles.
- Dye: If using dye for your tallow candles, add it to the melted tallow along with the fragrance oil. Stir well to distribute the color evenly throughout.
Pouring the Tallow Candles
Carefully pour the melted tallow into your prepared containers, leaving about ½ inch of space at the top. Pour slowly to avoid creating air bubbles in your emergency tallow candles.
Centering the Wicks
Immediately after pouring, use your wick centering devices (pencils, chopsticks, etc.) to ensure the wicks are perfectly centered in the containers for even burning of your emergency candles.
Cooling and Curing Your Tallow Candles
Allow the candles to cool and harden completely, undisturbed, at room temperature. This may take several hours, depending on the size of the candles. Avoid moving the tallow candles while they are cooling, as this can cause uneven surfaces or cracking. For best results, allow the candles to “cure” for at least 24-48 hours, and ideally for a week, before burning. Curing allows the fragrance to bind more fully to the tallow, resulting in a stronger scent throw and a better burn.⏳
Trimming the Wicks
Before the first burn of your homemade emergency candles, trim the wicks to about ¼ inch. This will help prevent smoking and ensure a clean, even burn during power outages.
Troubleshooting Common Tallow Candle Problems
- Tunneling (Candle burns down the center, leaving wax on the sides): The wick is likely too small for the container. Try a larger wick next time for better emergency candle performance.
- Mushrooming (Wick develops a large, mushroom-shaped carbon buildup): The wick is likely too large, or the candle may be burning for too long. Trim the wick more frequently, or try a smaller wick for your next batch of tallow candles.
- Smoking: The wick is too long, or there may be drafts. Trim the wick and make sure the candle is not in a drafty area to ensure clean burning emergency lighting.
- Uneven Surface: The candle may have cooled too quickly or been moved while cooling. Ensure the tallow emergency candle cools slowly and undisturbed for best results.
Burning and Storing Your Tallow Candles: Safety and Longevity
Essential Candle Safety for Emergency Situations ⚠️
- Never leave a burning emergency candle unattended, even during a blackout.
- Keep burning tallow candles away from flammable objects like curtains, books, and paper.
- Keep candles out of reach of children and pets.
- Always burn candles on a heat-resistant surface.
- Do not burn your emergency tallow candles for longer than 4 hours at a time.
Storing Your Tallow Candles for Maximum Shelf Life
- Store emergency candles in a cool, dark, dry place.
- Avoid direct sunlight, which can cause fading and scent loss.
- Properly rendered and stored tallow candles have an impressive shelf life and resist rancidity. Expect them to last for at least a year, and often much longer – perfect for long-term emergency preparedness.
Conclusion: Embrace the Glow of Emergency Preparedness and Sustainability
Making your own tallow candles for emergency use is a rewarding project that combines practical preparedness with a connection to traditional skills. You’re creating a long-burning, cost-effective, and sustainable light source, perfect for emergency situations or simply adding a touch of rustic charm to your home. By utilizing a readily available resource and reducing waste, you’re embracing a more self-reliant and environmentally conscious approach to emergency preparedness. 🌟
We encourage you to try making your own emergency tallow candles! It’s a simpler process than you might think, and the results are well worth the effort. The satisfaction of creating something so practical with your own hands – something that could provide comfort and security during an unexpected power outage – is immeasurable.
Have you tried making homemade tallow candles before? Share your experiences, questions, and photos in the comments below. And don’t forget to share this guide with others who might be interested in emergency preparedness and sustainable living!